Start Here
Quick Start
- Sign in with your PDRX user account.
- Check that company details, logo, and email settings are correct in `System -> Settings`.
- Load or sync open jobs before booking stock out to workers.
- Keep suppliers and items current before raising purchase orders.
- Use reports daily to monitor stock movement, job costing, and low-stock action items.
Visual Guide
Screen Tour
These are the real client-facing screens your team uses every day. Each image below matches one of the step-by-step help sections further down the page.
Users
Roles And Access
Clerk
Best for stock issue capture, barcode entry, worker allocation, and normal processing.
Supervisor
Can manage jobs, stock, orders, receiving, reports, and operational review.
Admin
Can manage settings, users, thresholds, company branding, and full workshop controls.
Workshop Flow
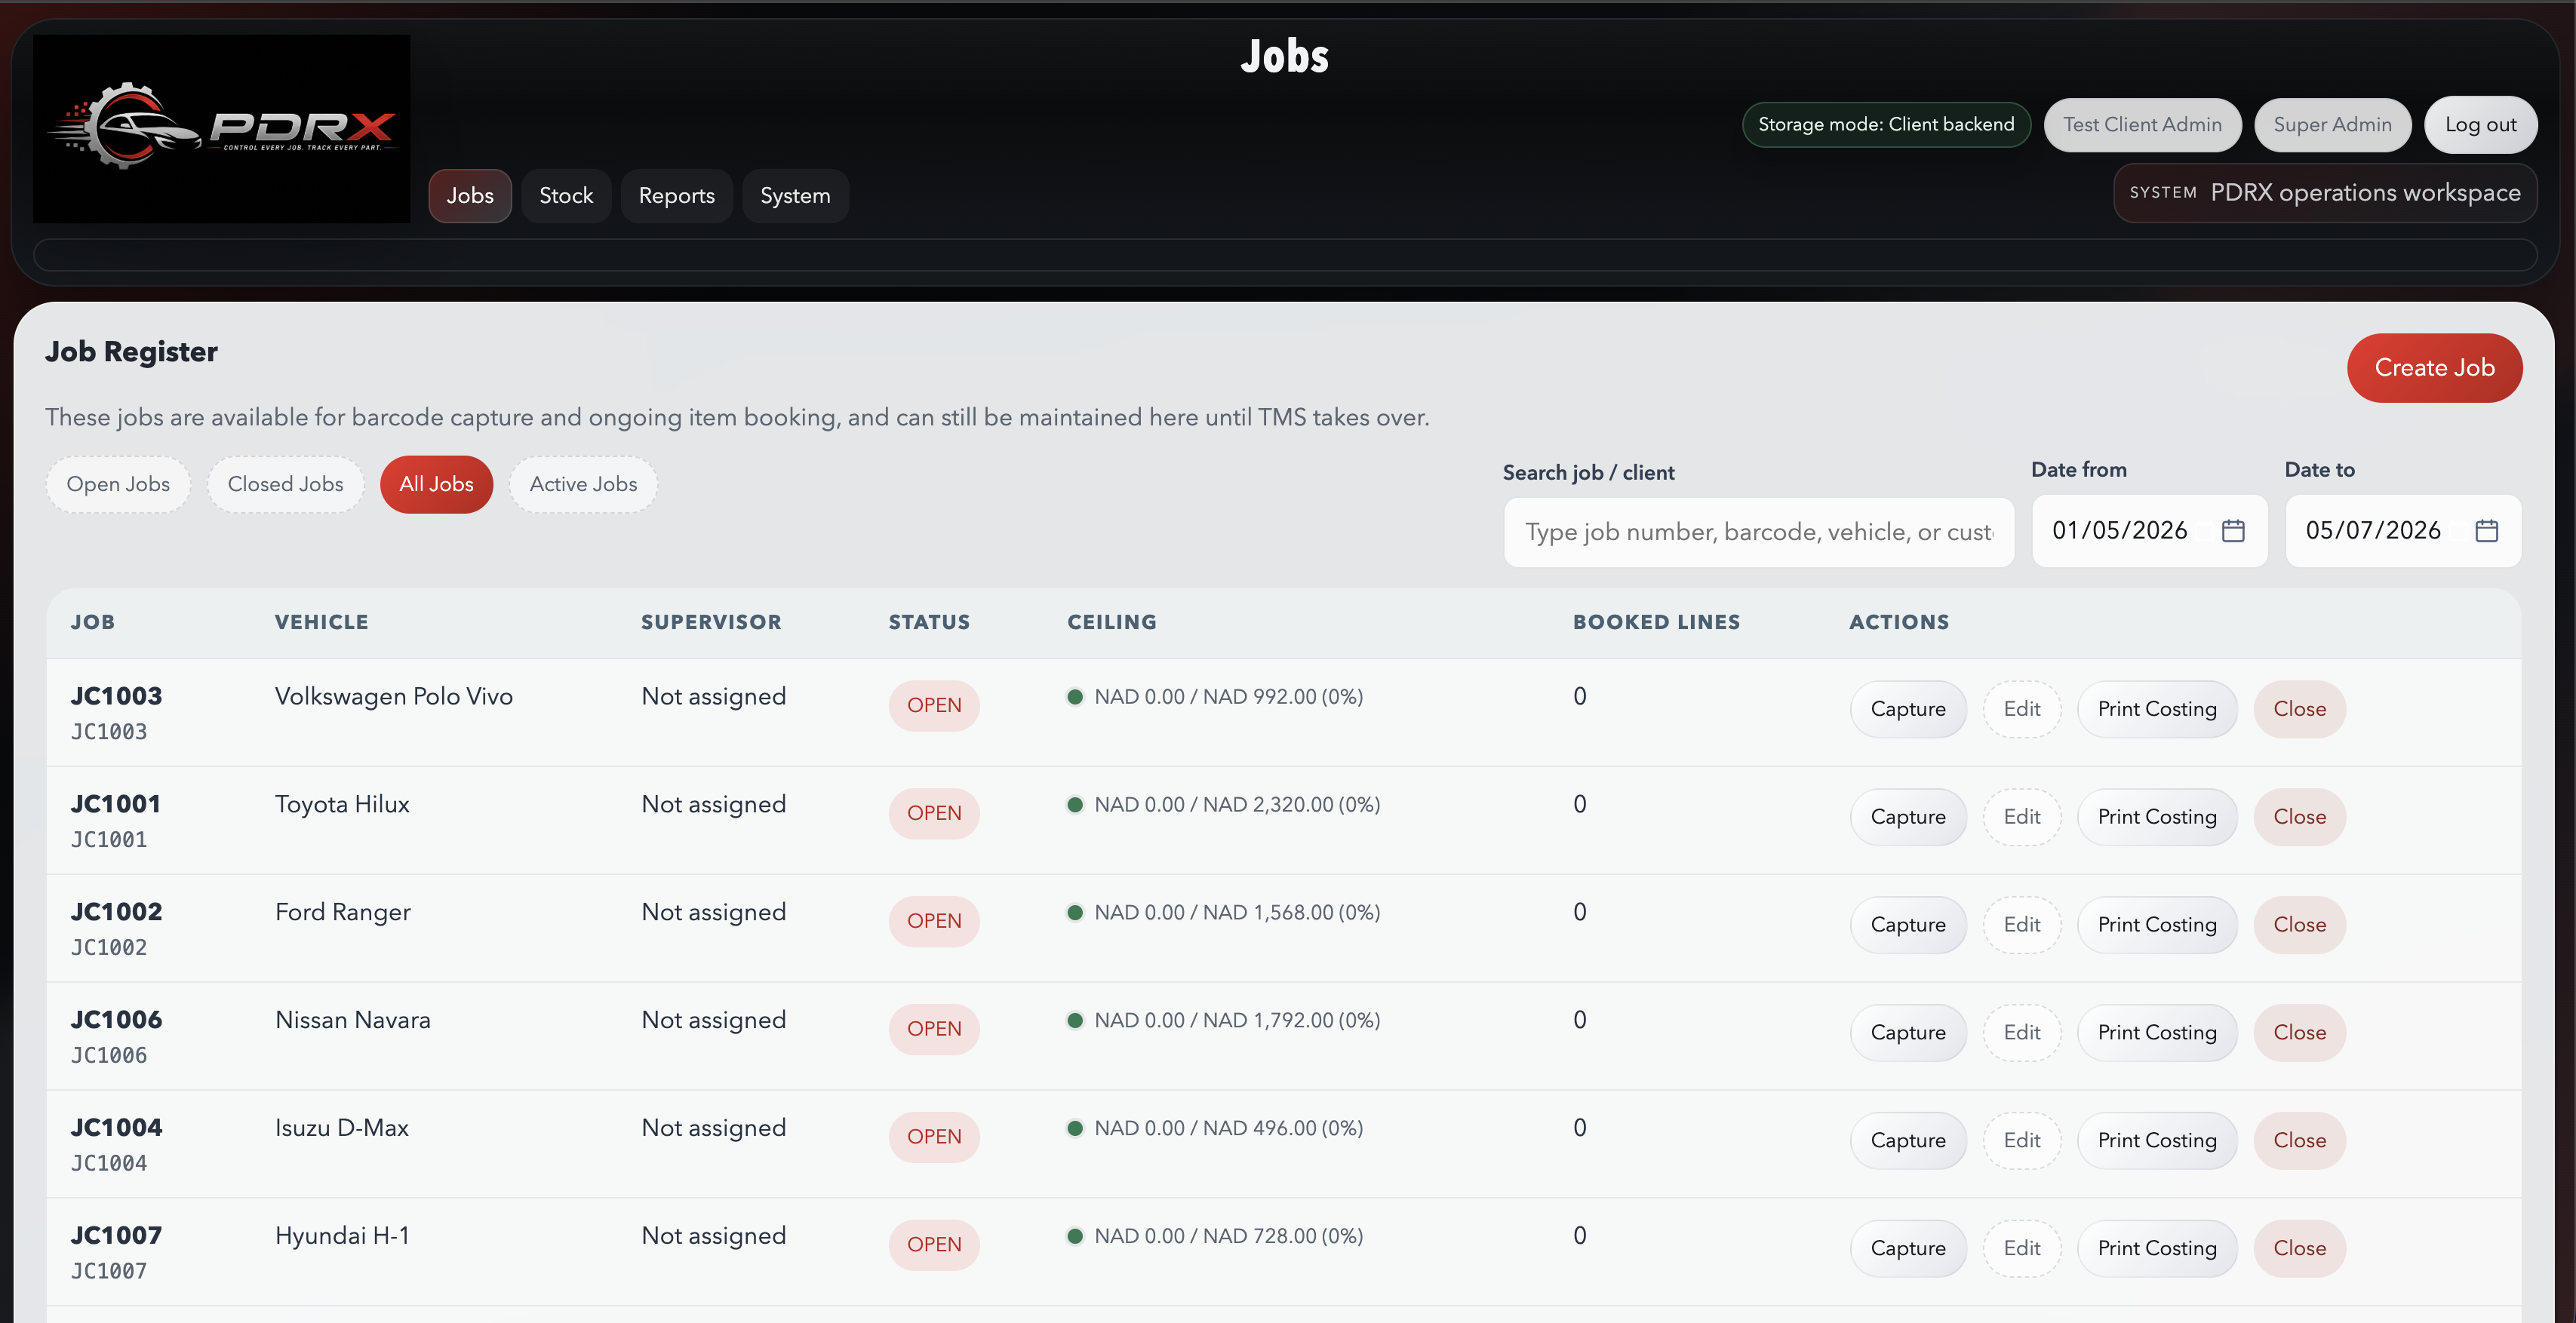
Jobs Workflow
View open jobs
- Open the `Jobs` menu.
- Review the open job list and use search to find the correct job number or client.
- Check the status, supervisor, and ceiling display before booking stock.
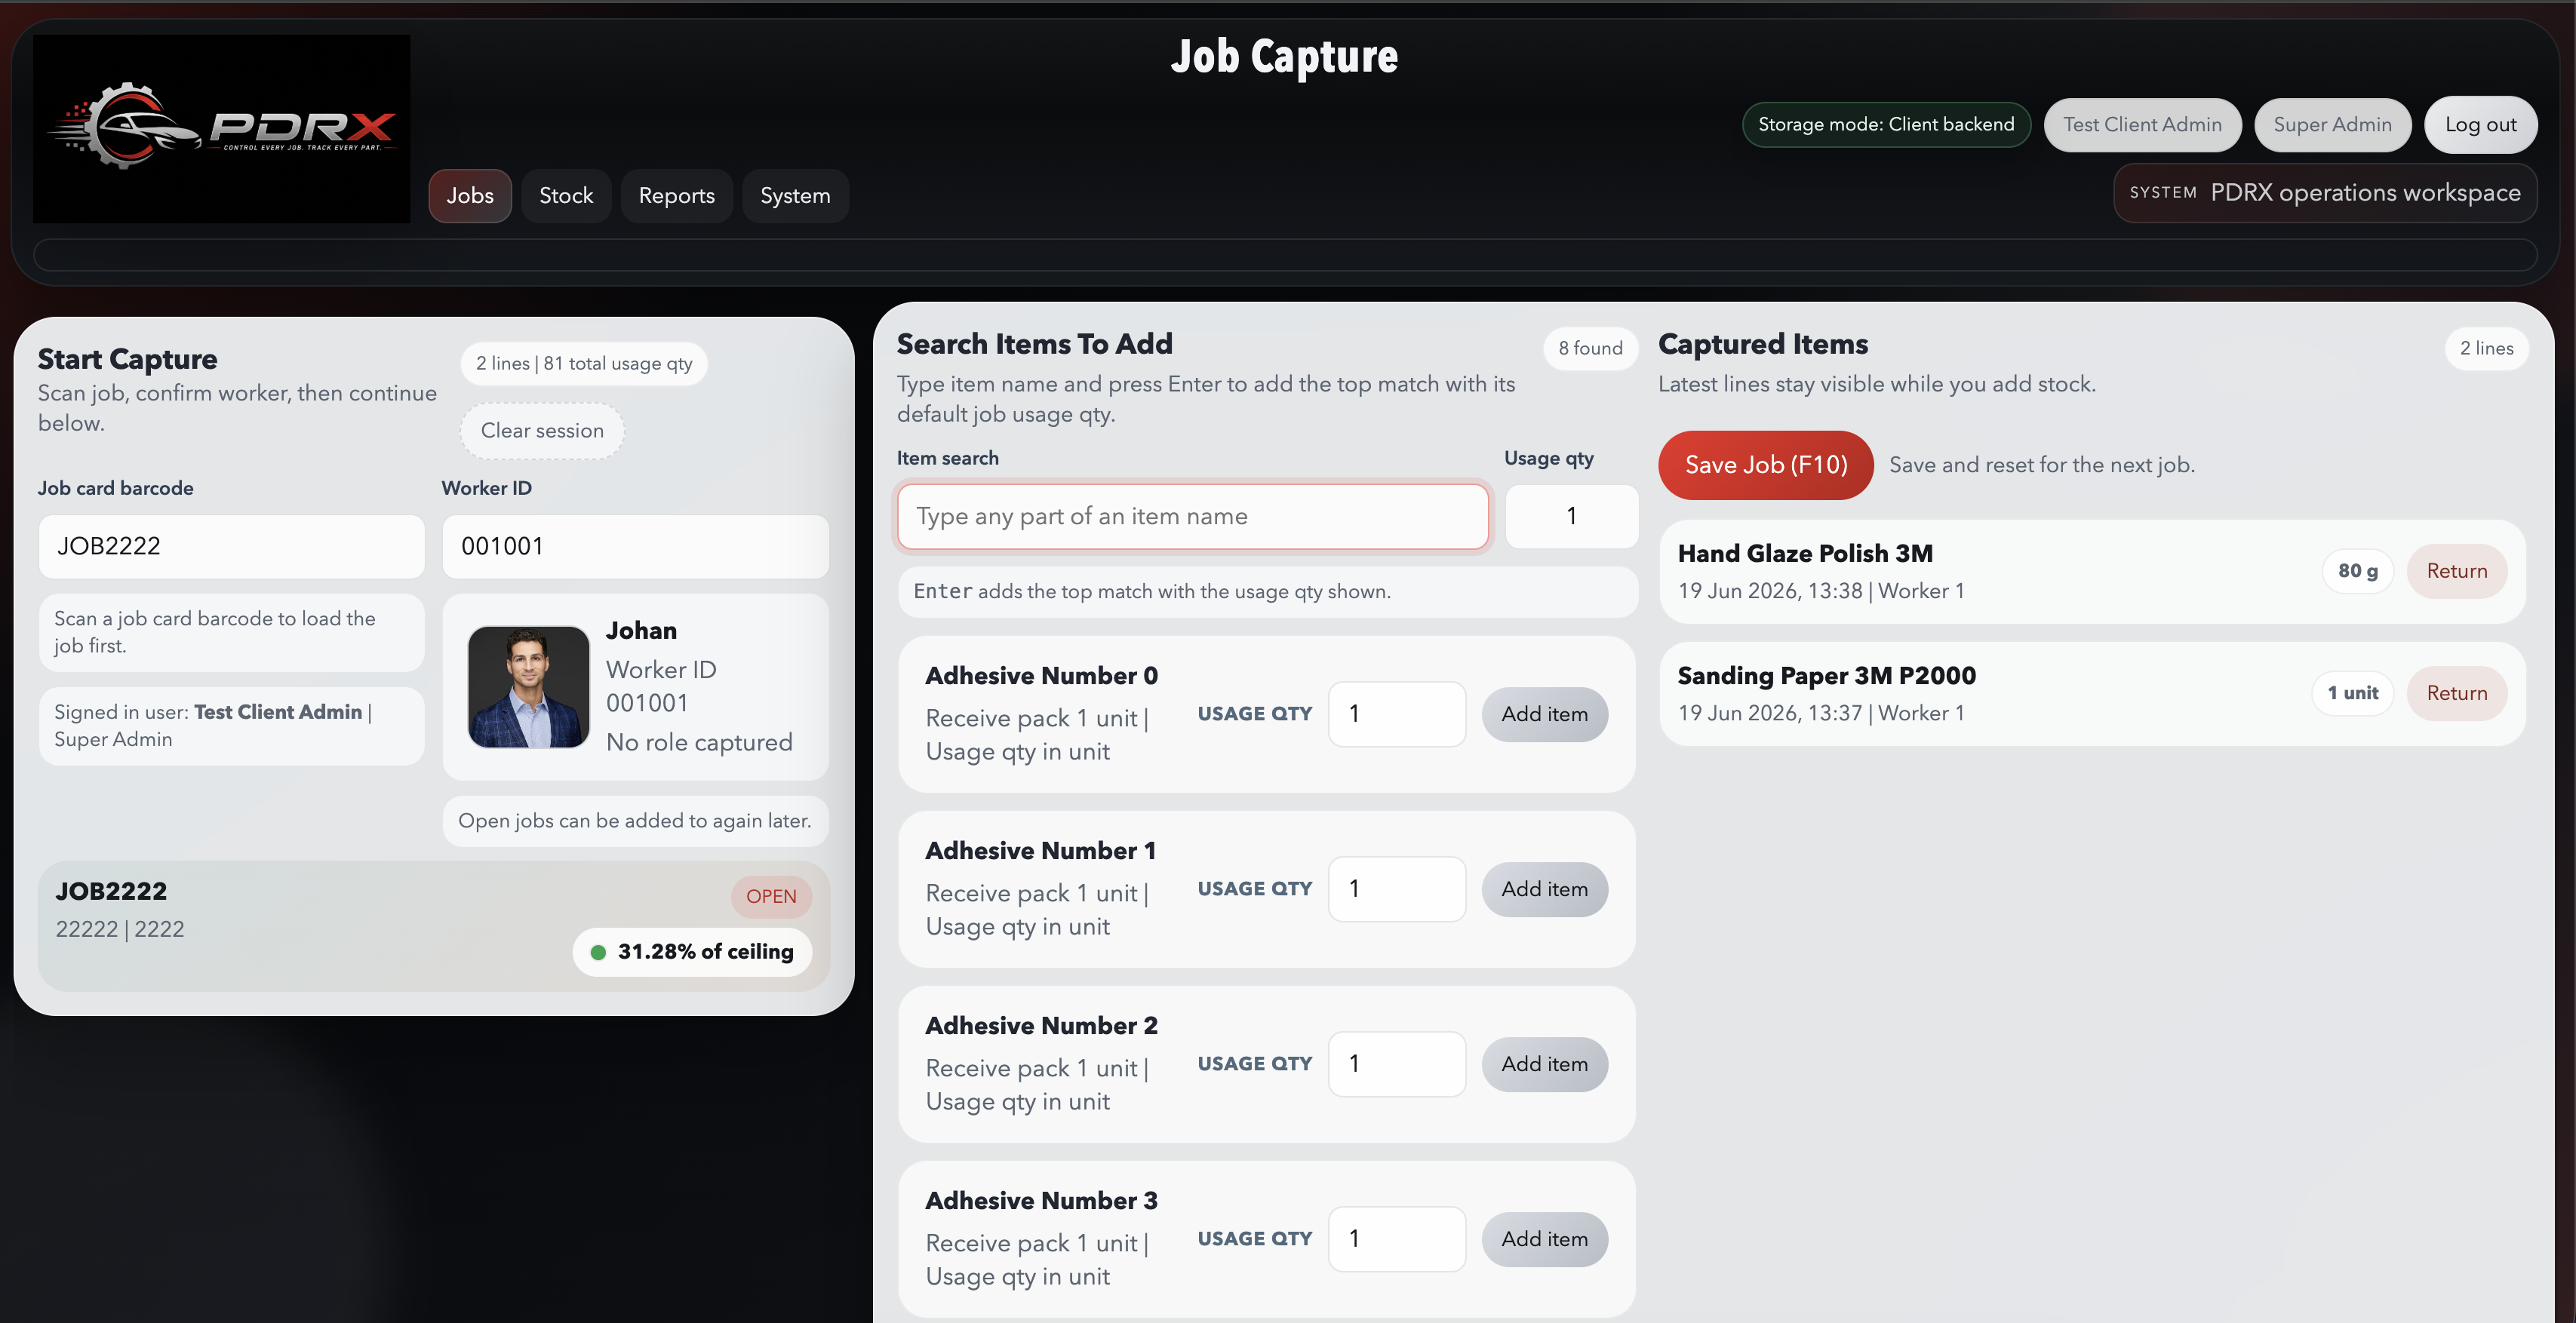
Book stock to a job
- Open the job you want to work on.
- Select the correct worker or clerk if prompted.
- Scan or search the stock item and confirm the quantity before saving.
Close a job
- Make sure all legitimate stock bookings are complete.
- Use the close action in the `Jobs` area.
- Only re-open a job if more valid work still needs to be captured.
Understand ceiling values
- Watch the ceiling display in the job list or job costing views.
- Green means the job is healthy against the allowed value.
- Yellow or red means the current cost is approaching or exceeding the limit.
 Click to enlarge
 Click to enlarge
Inventory
Stock Workflow
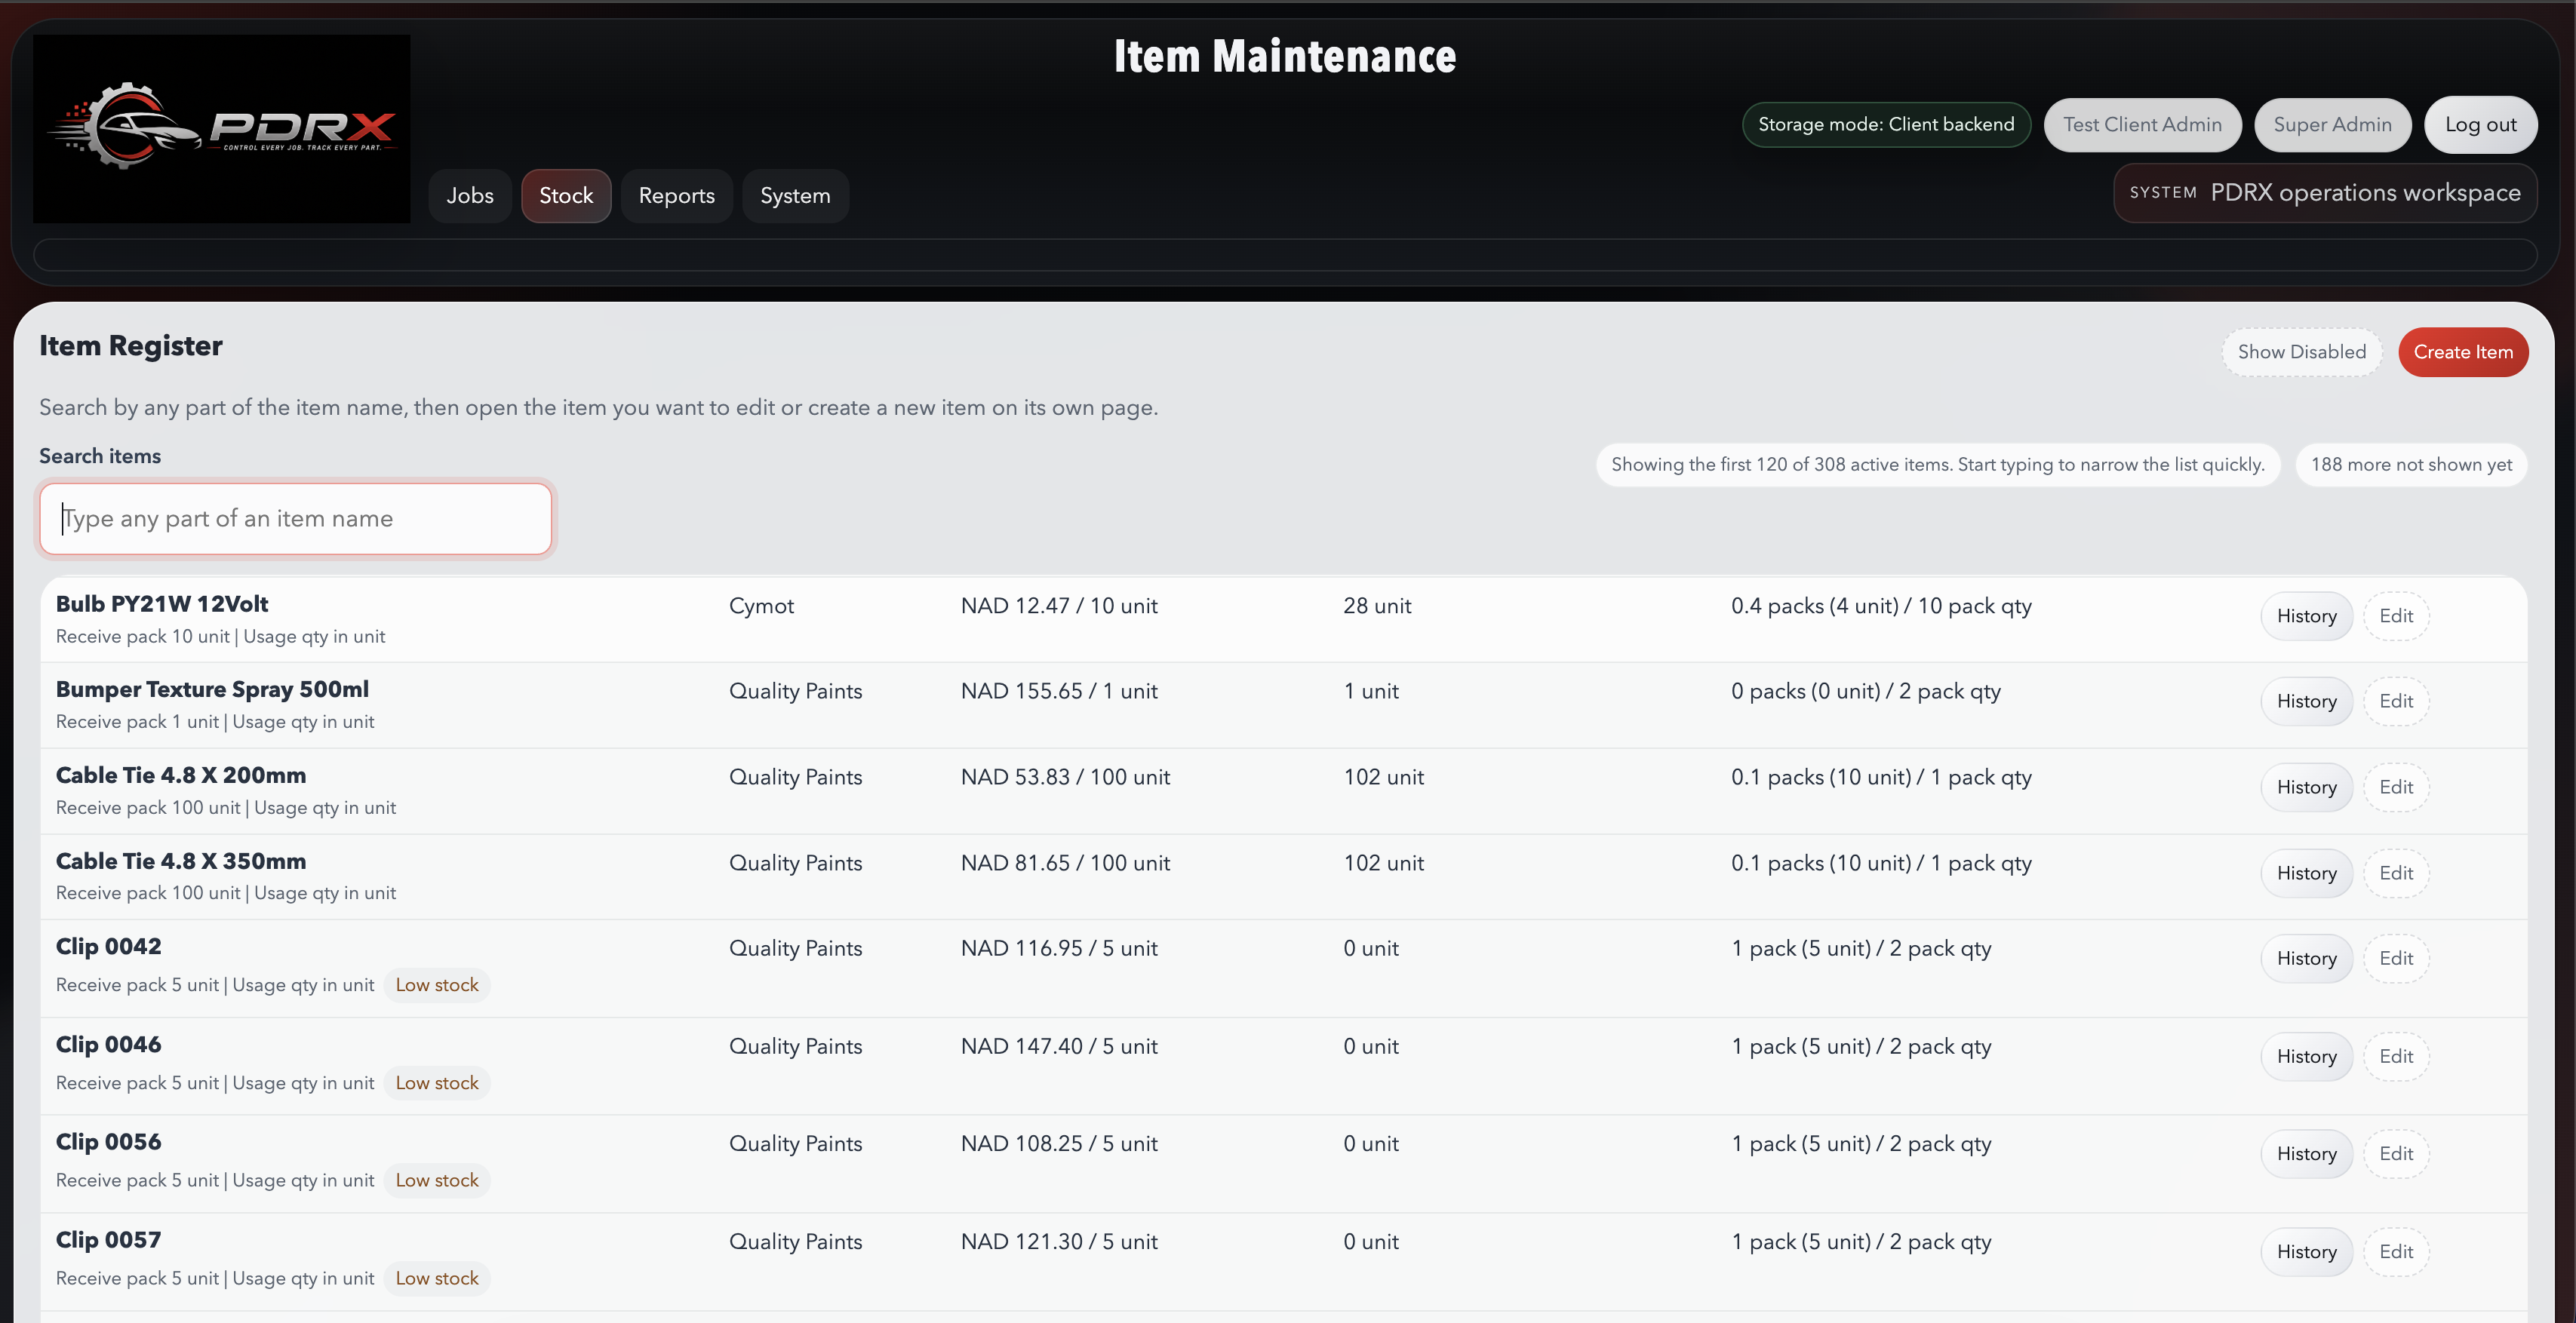
Add or update an item
- Go to `Stock` and open the items area.
- Create a new item or edit an existing one.
- Confirm supplier, unit, cost, sell value, and receive-pack settings before saving.
Issue stock correctly
- Confirm the correct job and worker first.
- Select the exact stock item and enter the quantity carefully.
- Save the line and check that the booking appears on the job record.
Check stock on hand
- Open the stock or item reports area.
- Run the stock on hand or low stock report.
- Use the result to decide whether you must order or investigate shortages.
Run stocktake
- Open the stocktake function from the stock module.
- Count the real stock physically before entering values.
- Review variances and save only once the count is correct.
 Click to enlarge
Master Data
Suppliers And Workers
Add a supplier
- Open the supplier area under `Stock`.
- Capture the supplier name and contact details.
- Save the record so orders can be linked correctly.
Update supplier email
- Open the supplier record.
- Enter the correct email address for orders.
- Save the change so the mail composer can pre-fill it later.
Add a worker
- Open the workers area.
- Create the worker record with the correct name.
- Use that worker name consistently for all future bookings.
Why this matters
- Suppliers drive purchase orders and receiving history.
- Workers drive job costing and usage reporting.
- Clean master data means cleaner reports and fewer mistakes.
 Click to enlarge
 Click to enlarge
 Click to enlarge
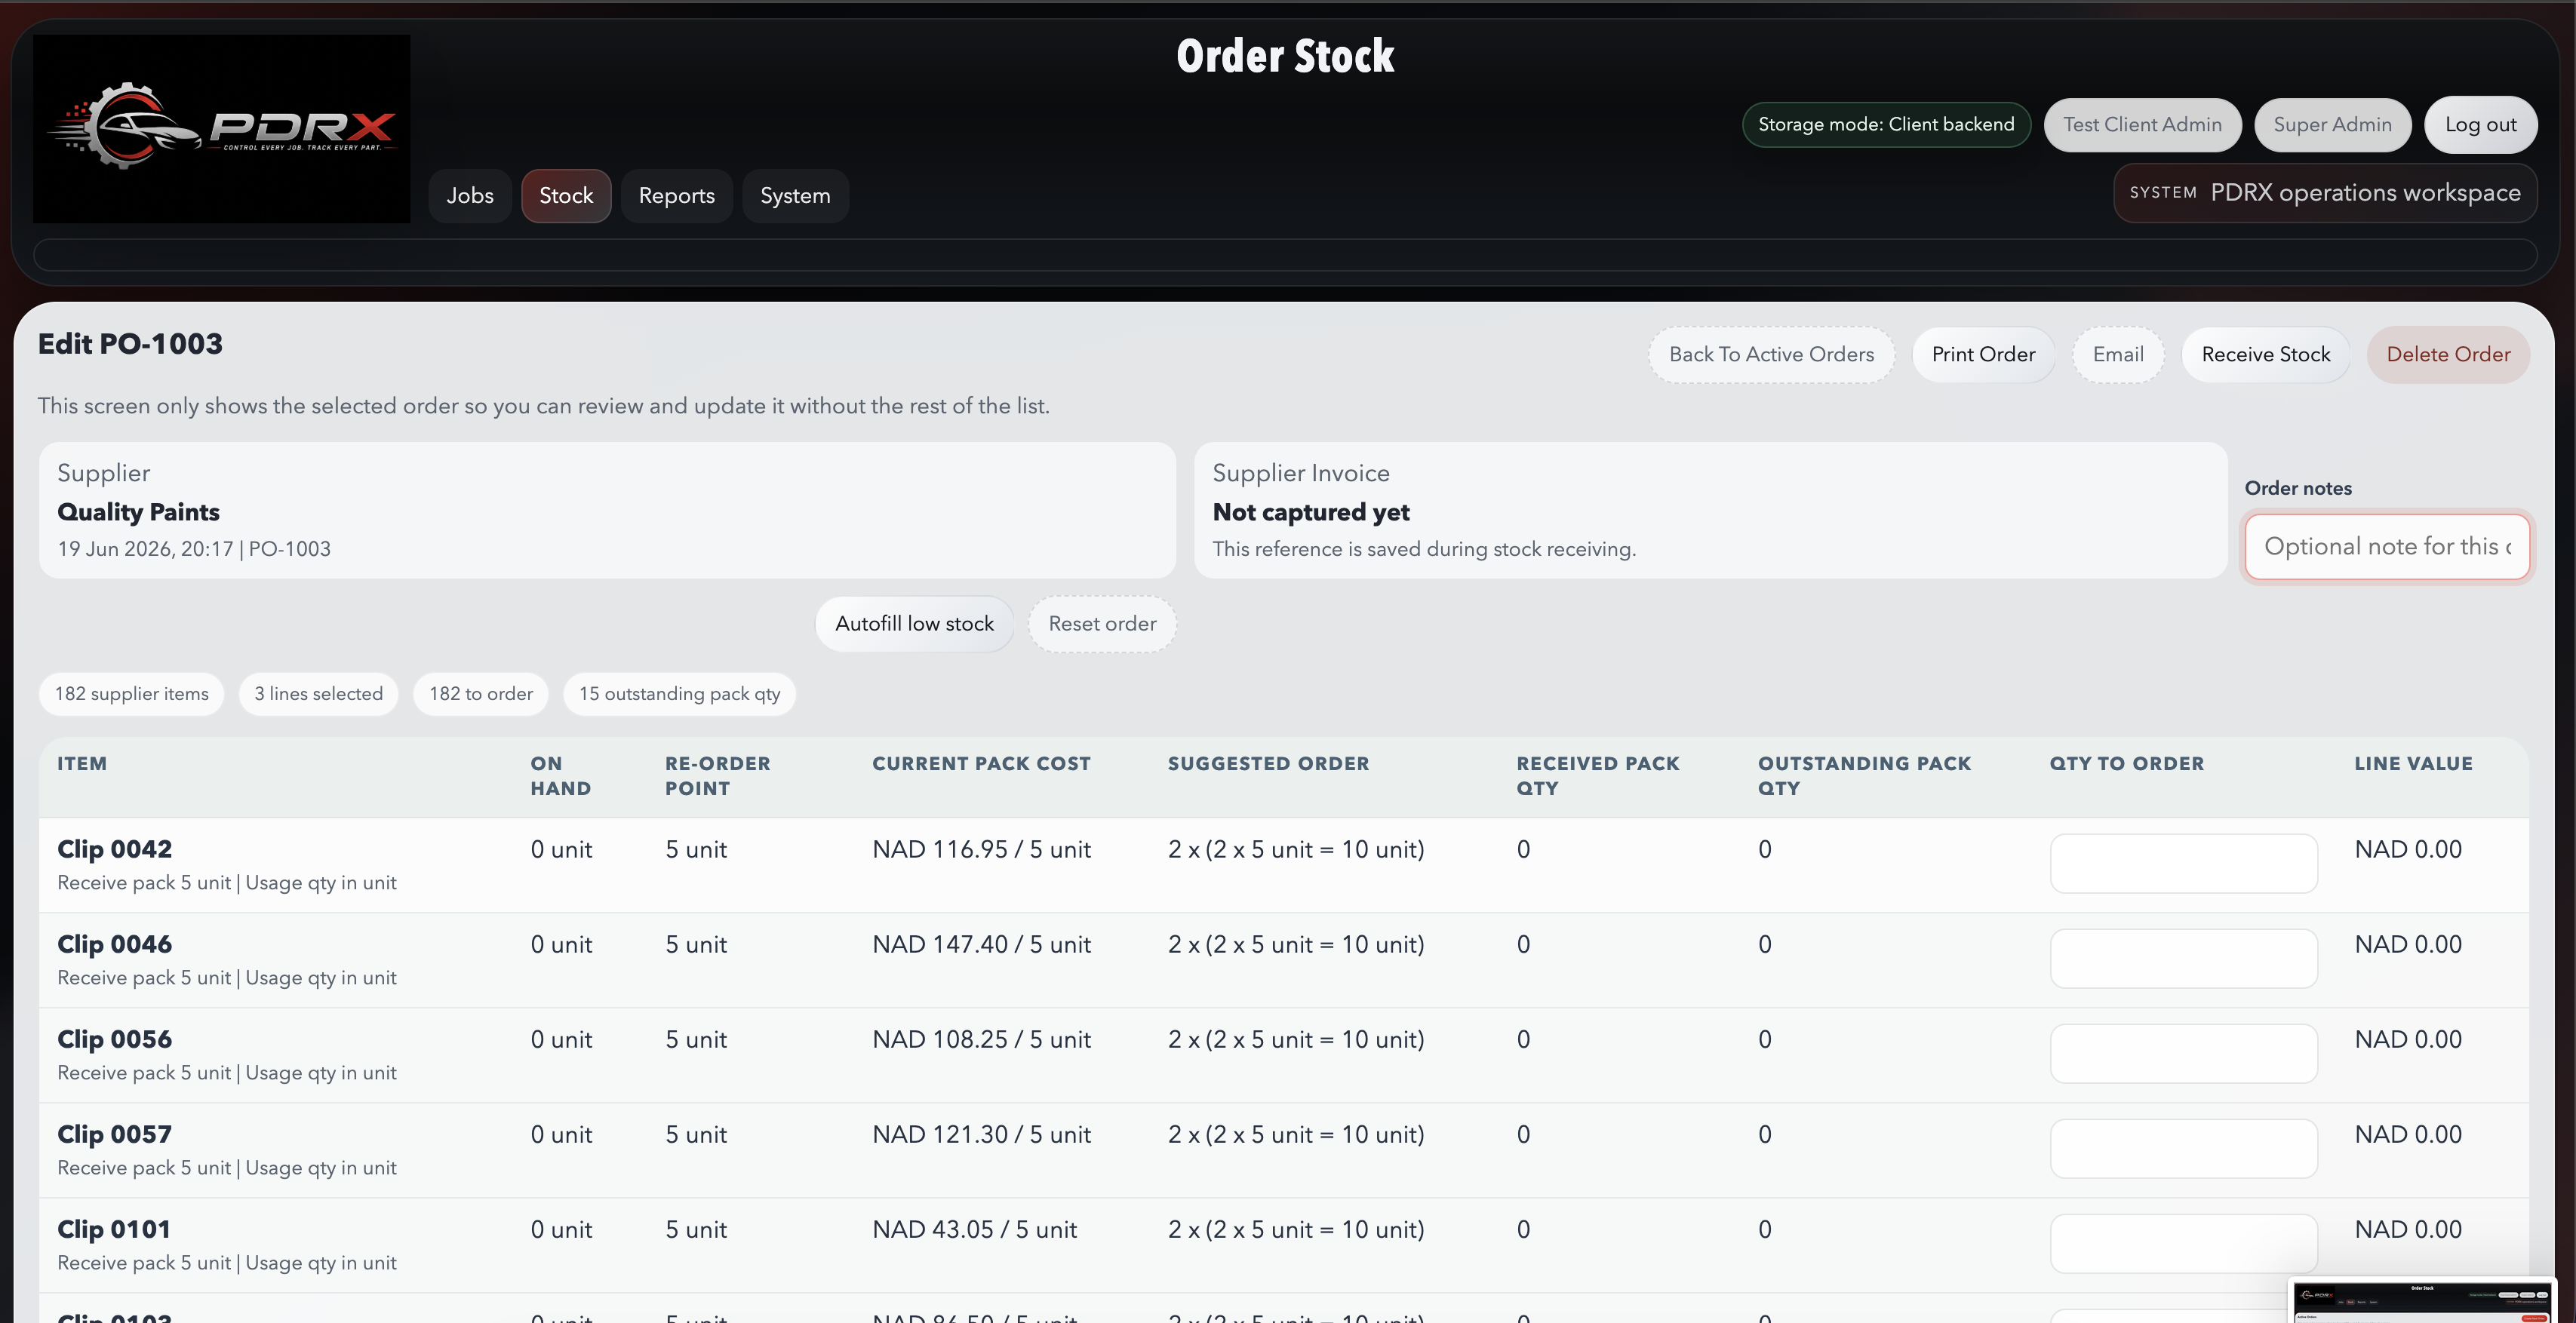
Purchasing
Orders And Receiving
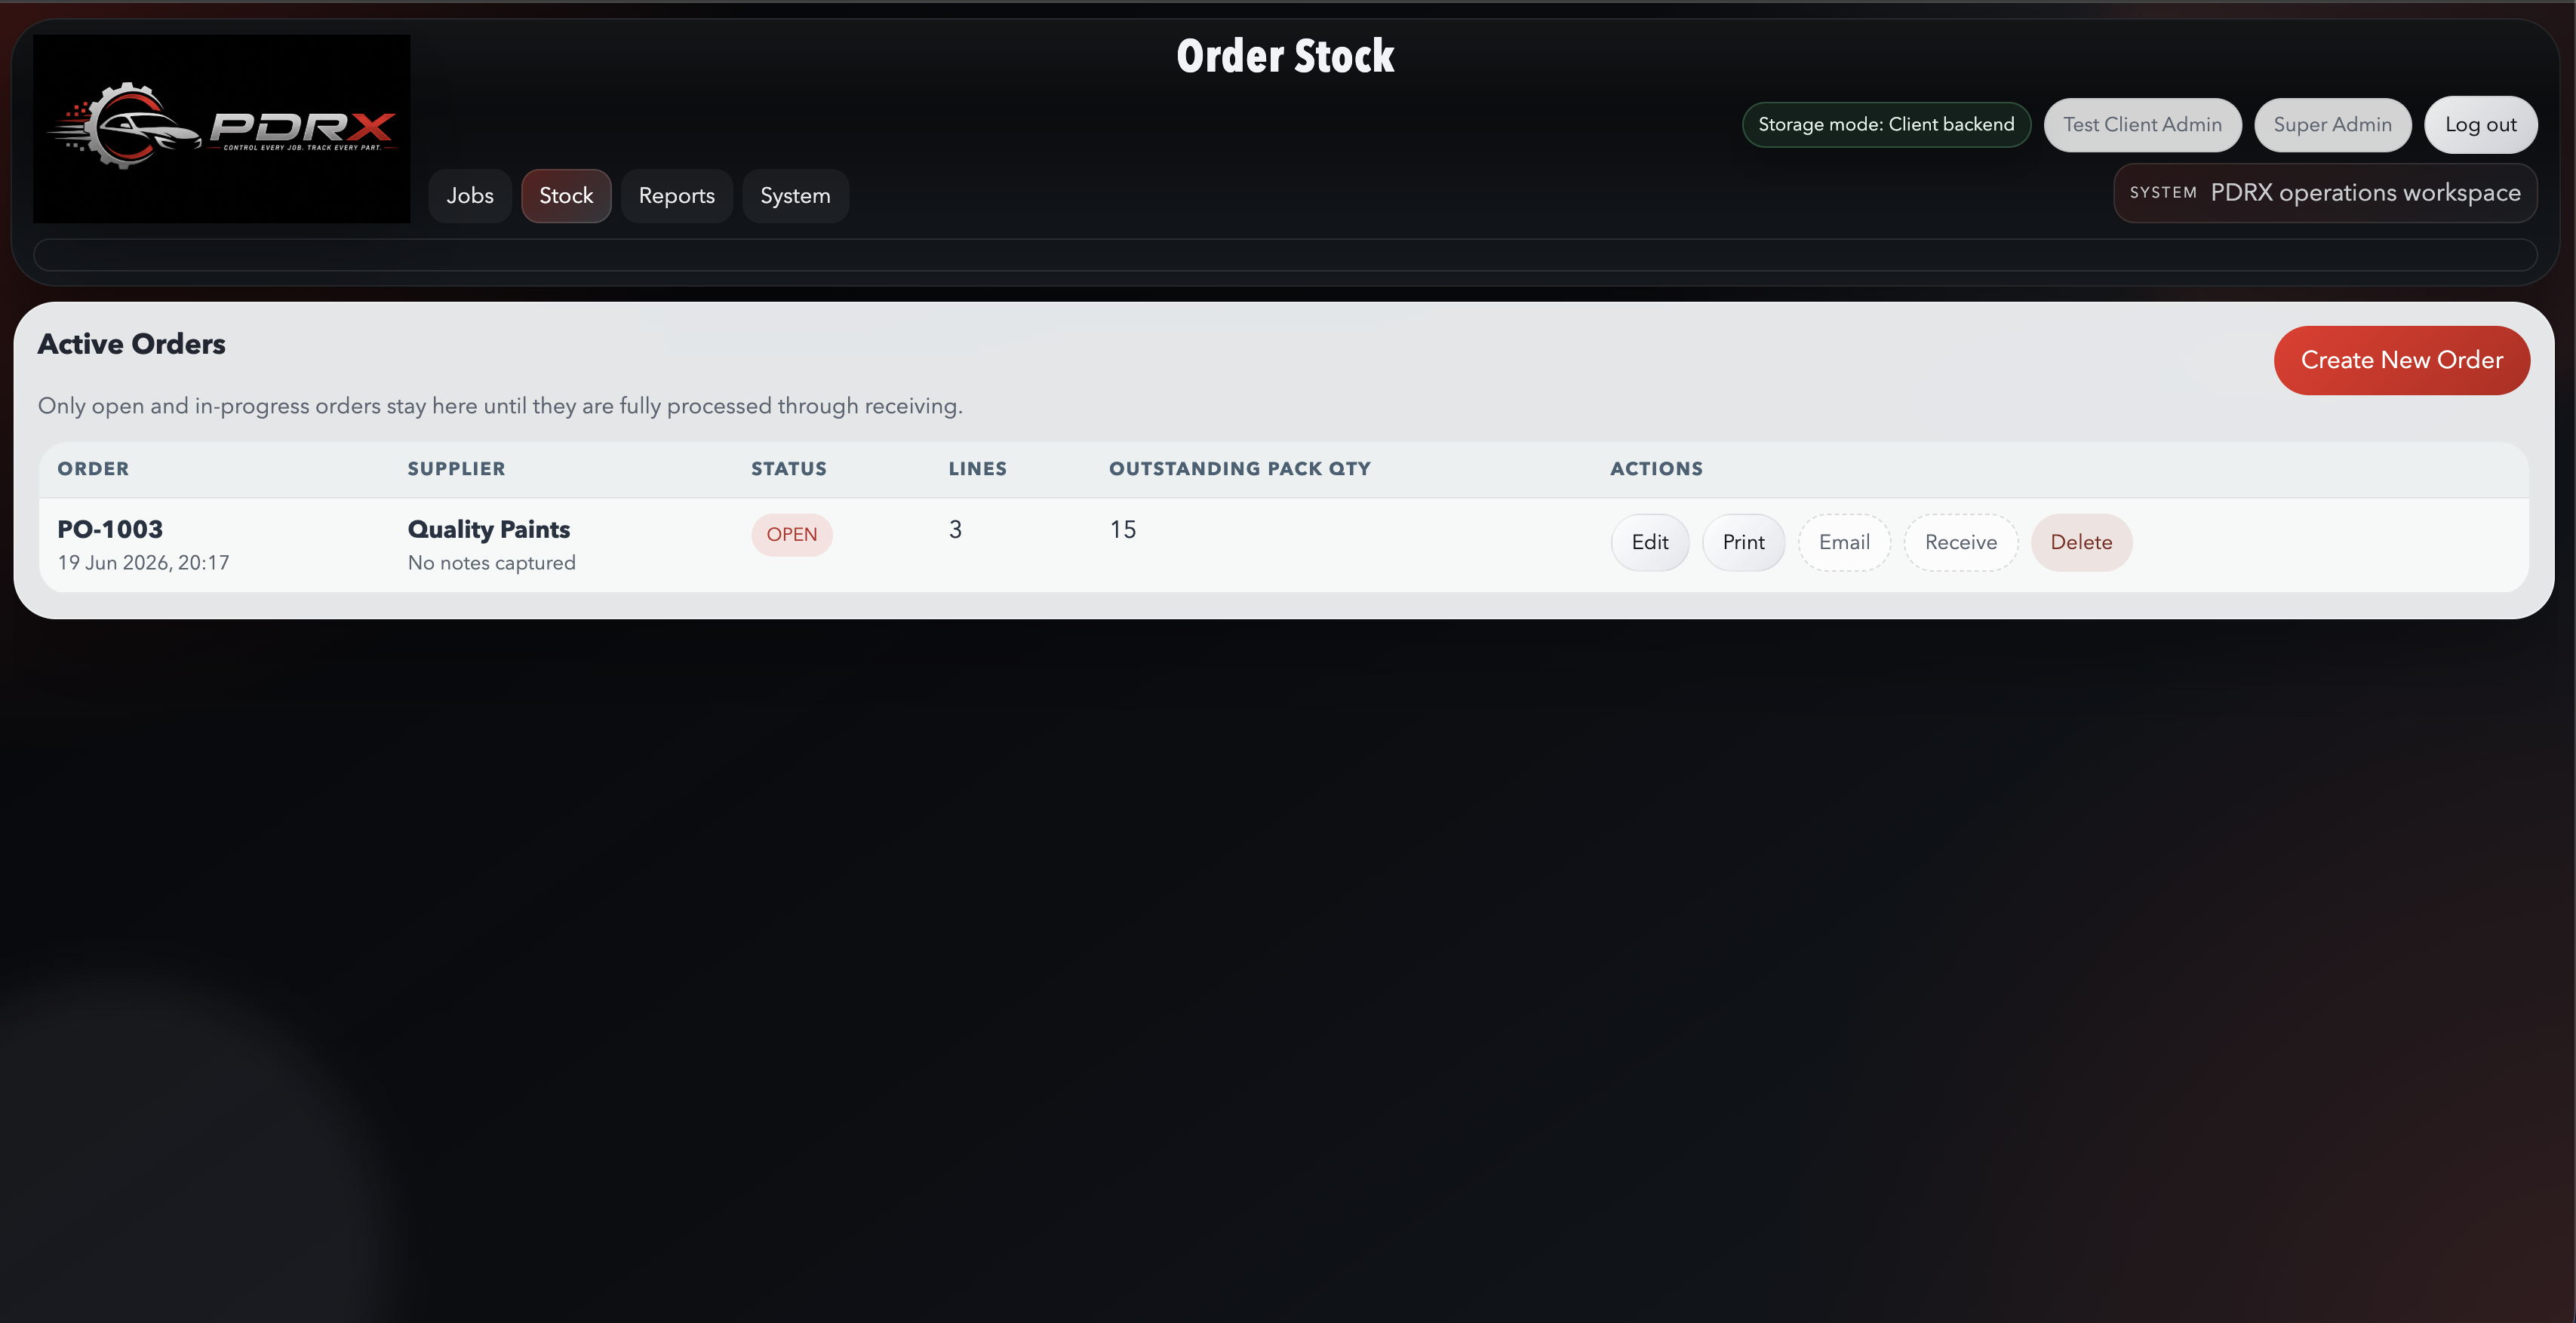
Create a purchase order
- Open `Order Stock` from the stock module.
- Choose the correct supplier and add the required lines.
- Review pack quantities and totals, then save the order.
Email the order
- Click the order `Email` button.
- Confirm the supplier email, subject, and message in the composer.
- Send the email with the PDF attachment once everything looks correct.
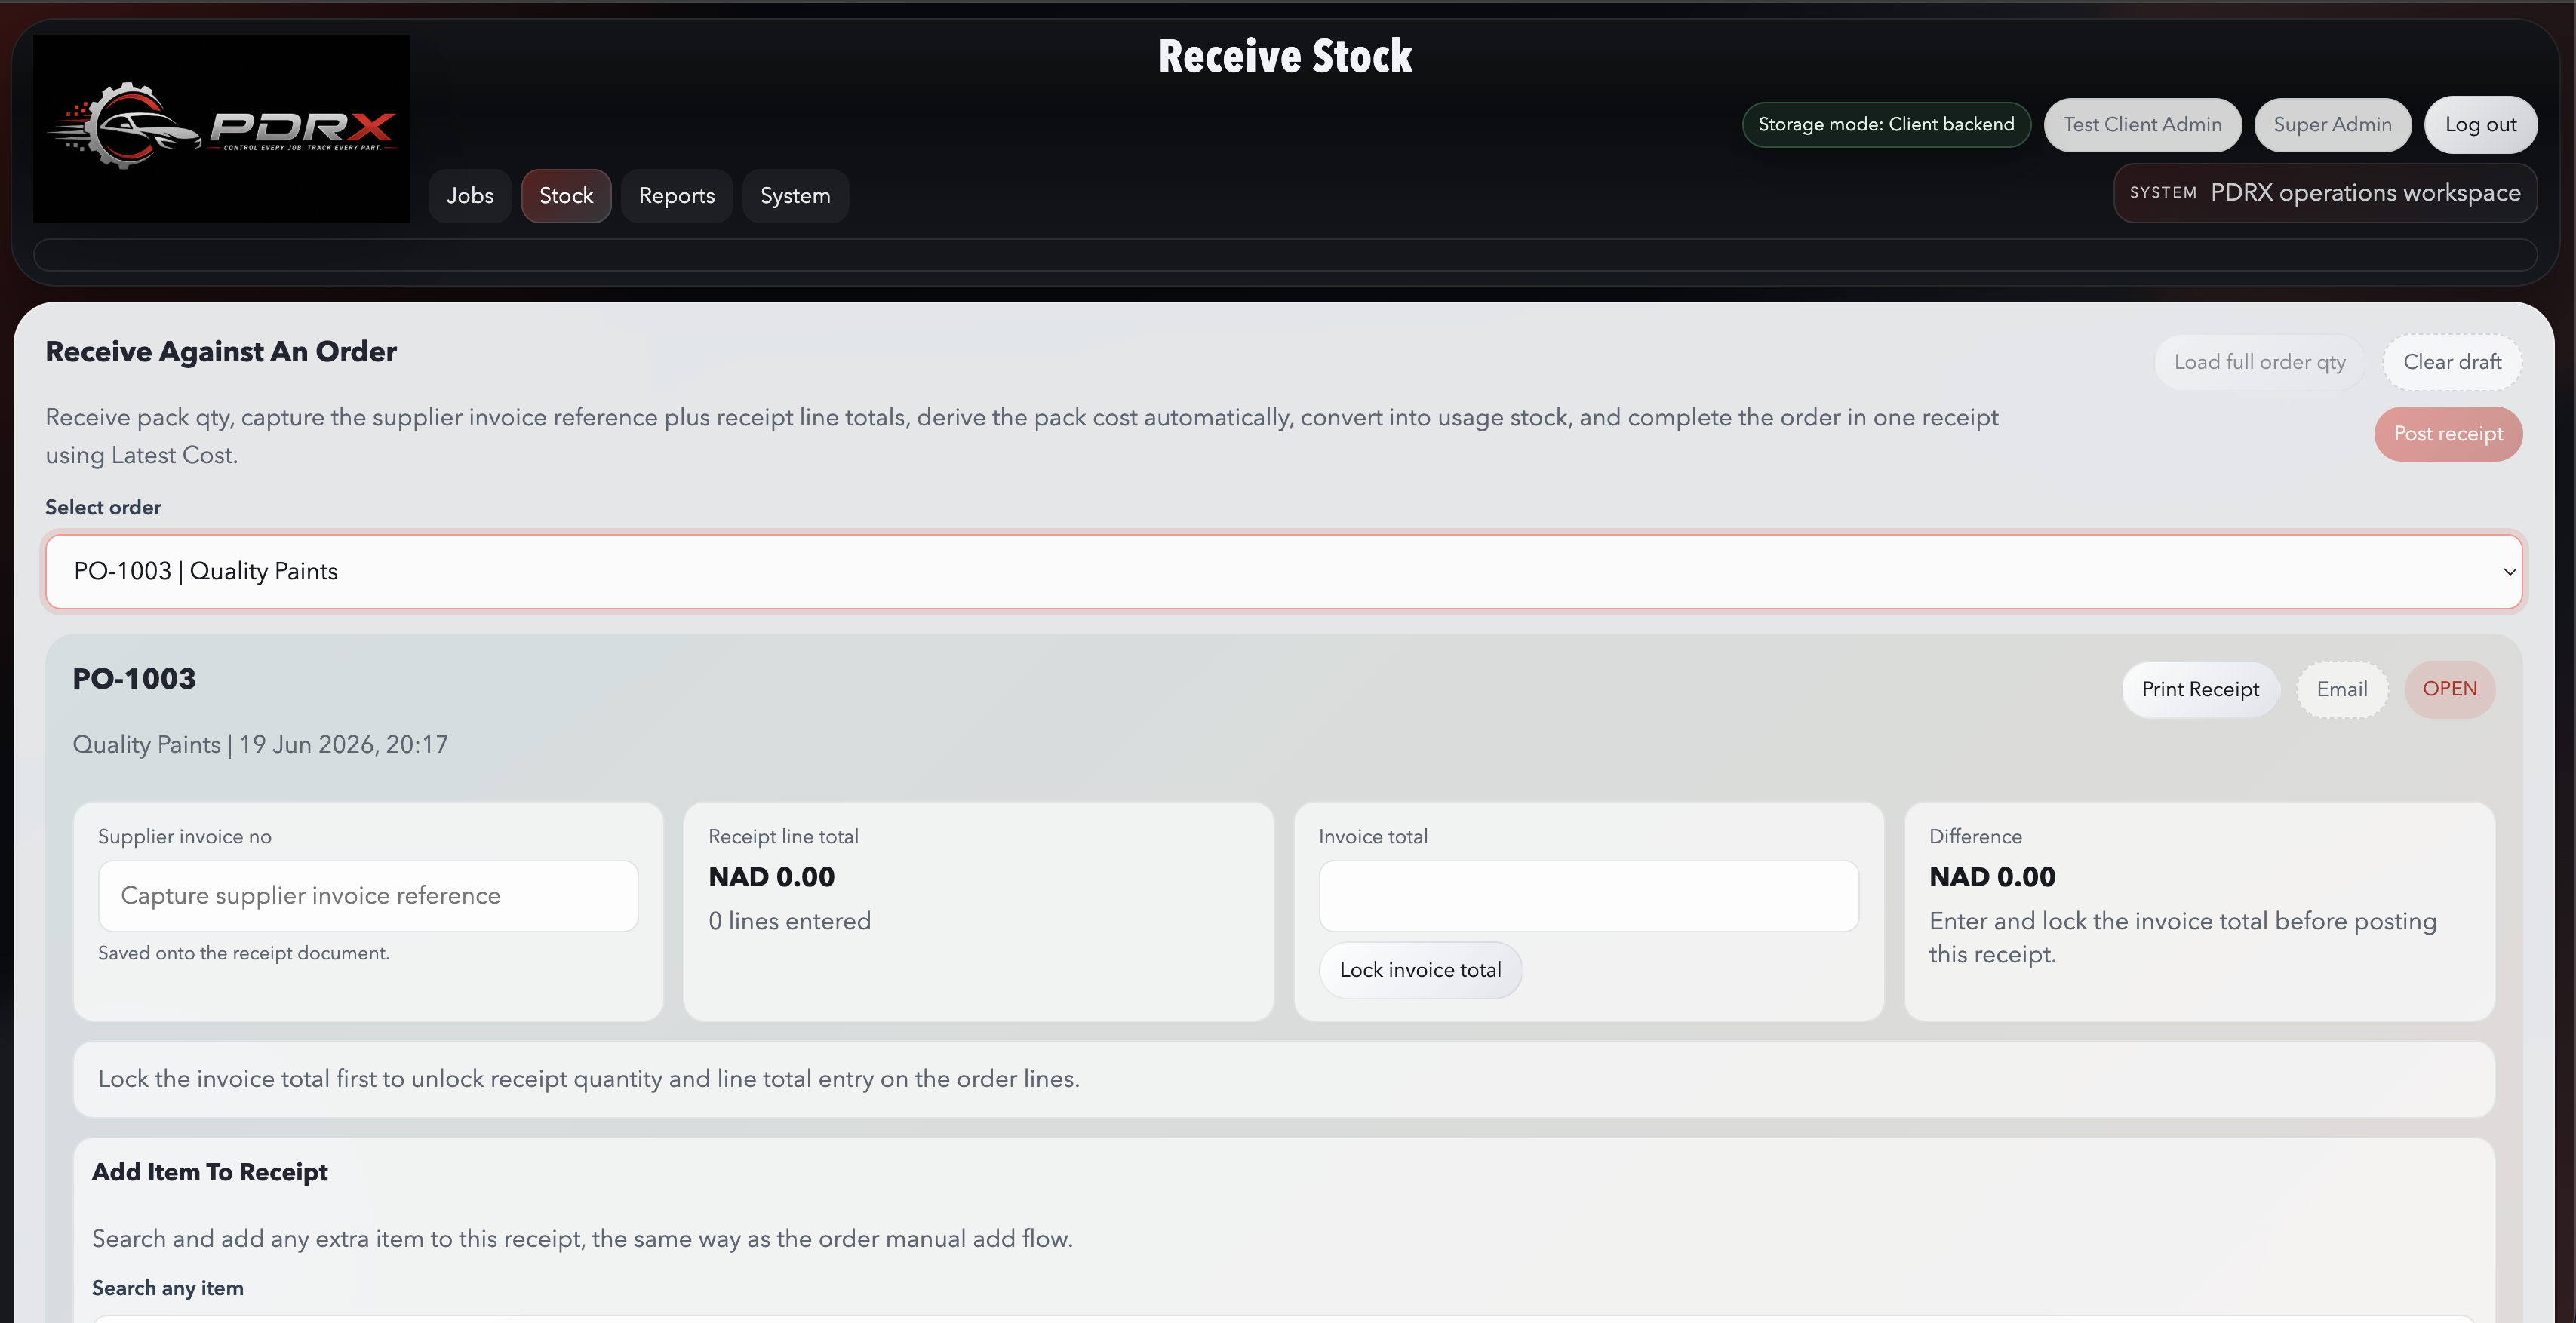
Receive an order
- Open the saved order and choose `Receive`.
- Confirm the delivered quantities and pack costs.
- Save the receipt so on-hand stock is updated properly.
Check cost variance
- Watch for price or pack-cost changes during receiving.
- Confirm the new cost before final save.
- Use stock movement and item history reports if you need to investigate later.
 Click to enlarge
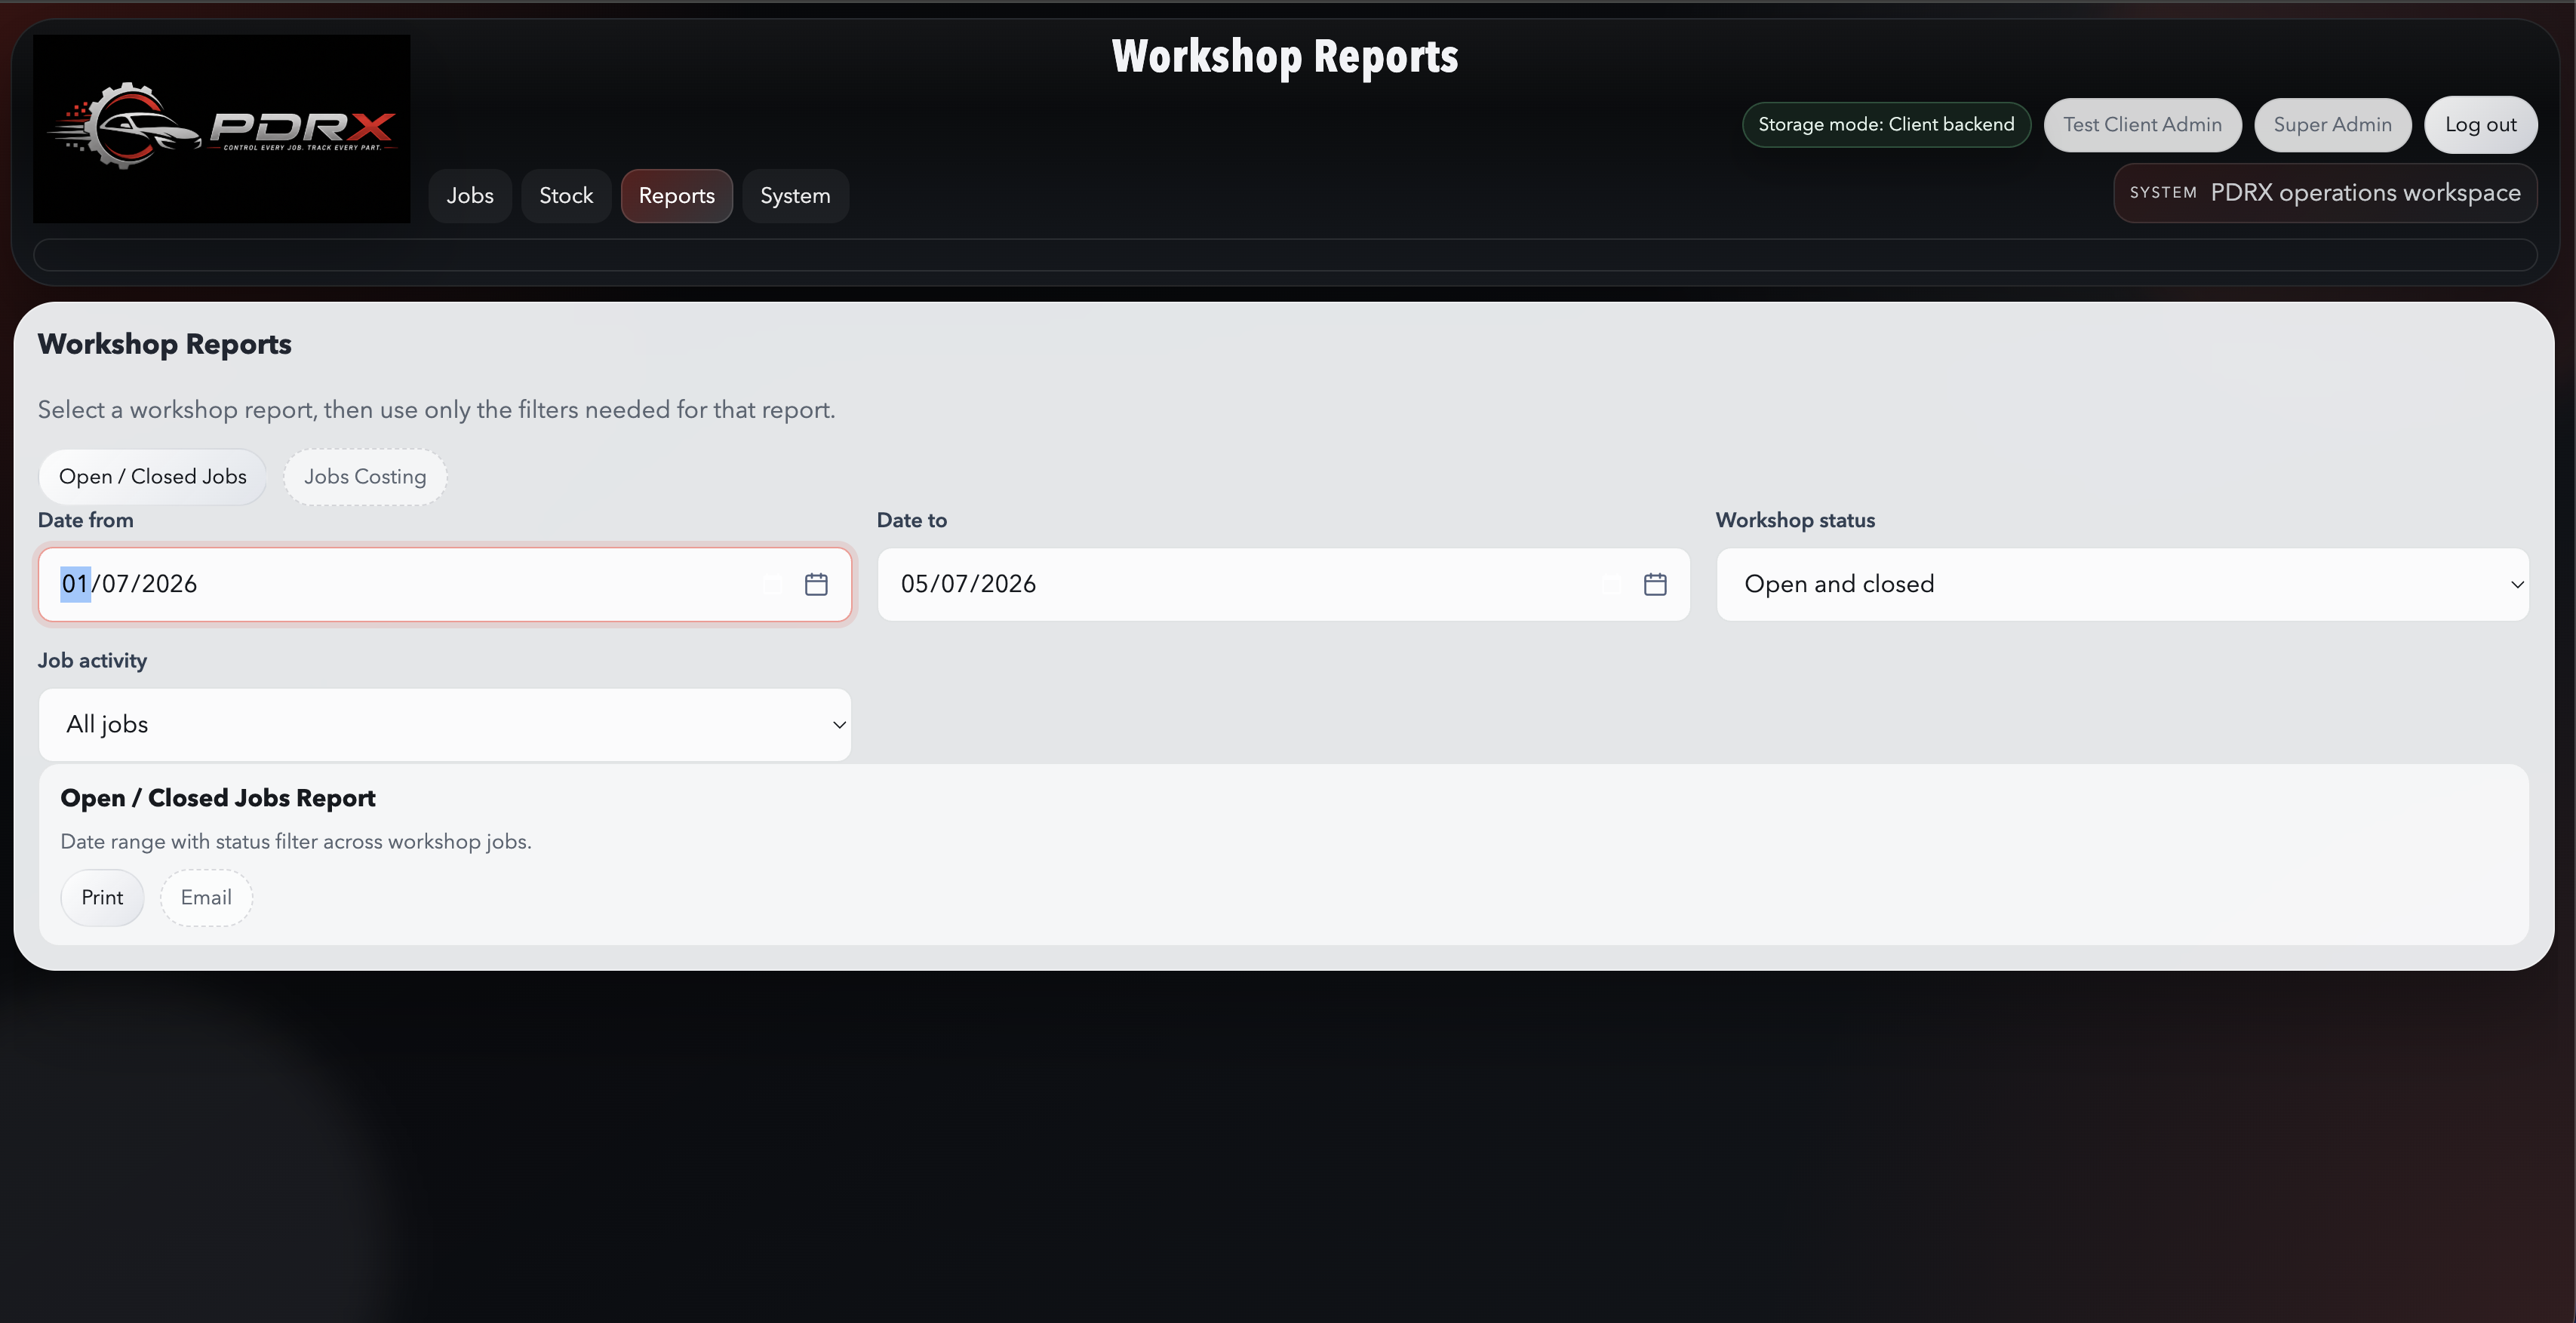
Visibility
Reports
Workshop Reports
Open vs closed jobs, job costing, stock movement, and operational summaries.
Worker Reports
Items booked per worker, jobs per worker, and worker register output.
Item Reports
Stock on hand, low stock, item history, stocktake, and variance reports.
Output
Most reports support browser print and email with PDF attachment in the hosted version.
Run a report
- Open the `Reports` menu and choose the right report group.
- Set the date range or filters.
- Run the report and review the totals before printing or emailing.
Use reports daily
- Use workshop reports to watch costing and open work.
- Use item reports to watch stock levels and movement.
- Use worker reports to review usage patterns and accountability.
 Click to enlarge
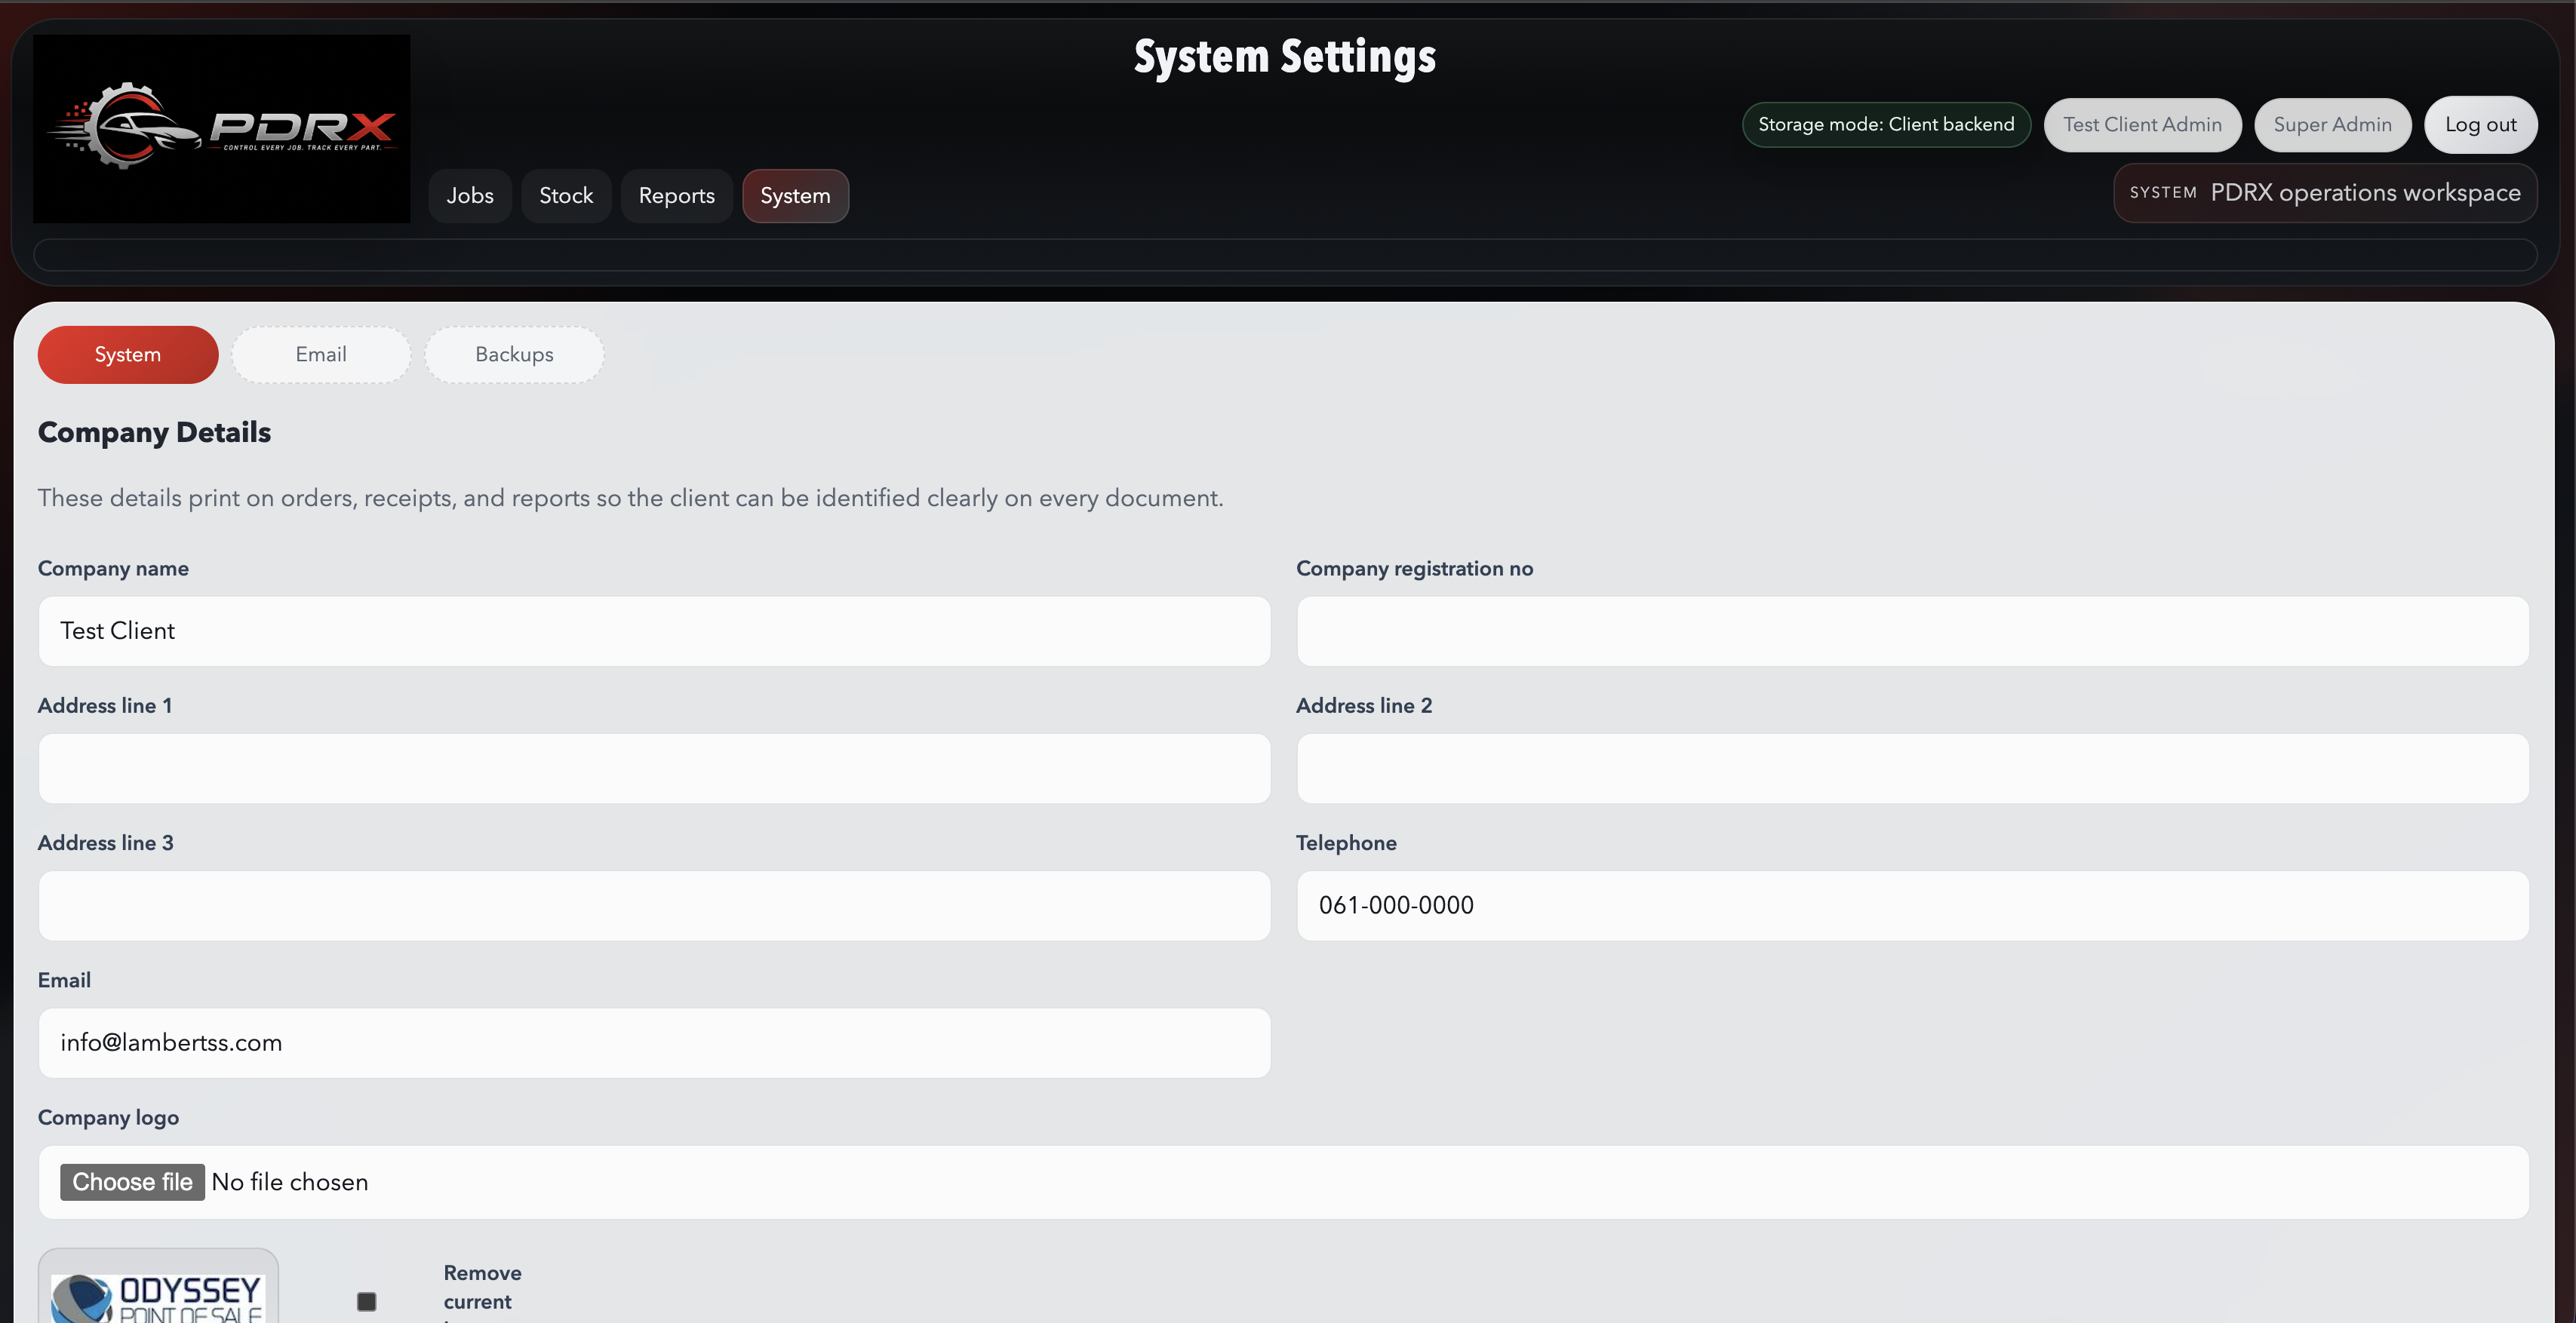
Configuration
System Settings
Update company details
- Open `System -> Settings`.
- Update the company name, phone, email, and other business details.
- Save and test by opening a print preview or email composer.
Update company logo
- Open the company or branding settings.
- Upload the correct client logo.
- Print an order or jobcard to confirm it displays properly.
Set stock rules
- Review whether negative stock should be allowed.
- Review ceiling warning percentages if your rollout uses ceiling values.
- Save the settings and monitor live use after the change.
Email defaults
- Open the email settings area.
- Review sender name, reply-to behavior, and delivery mode.
- Send a test order or report email after saving changes.
 Click to enlarge
Documents
Email And Print
- Print output opens in the browser and uses the hosted PDF layout.
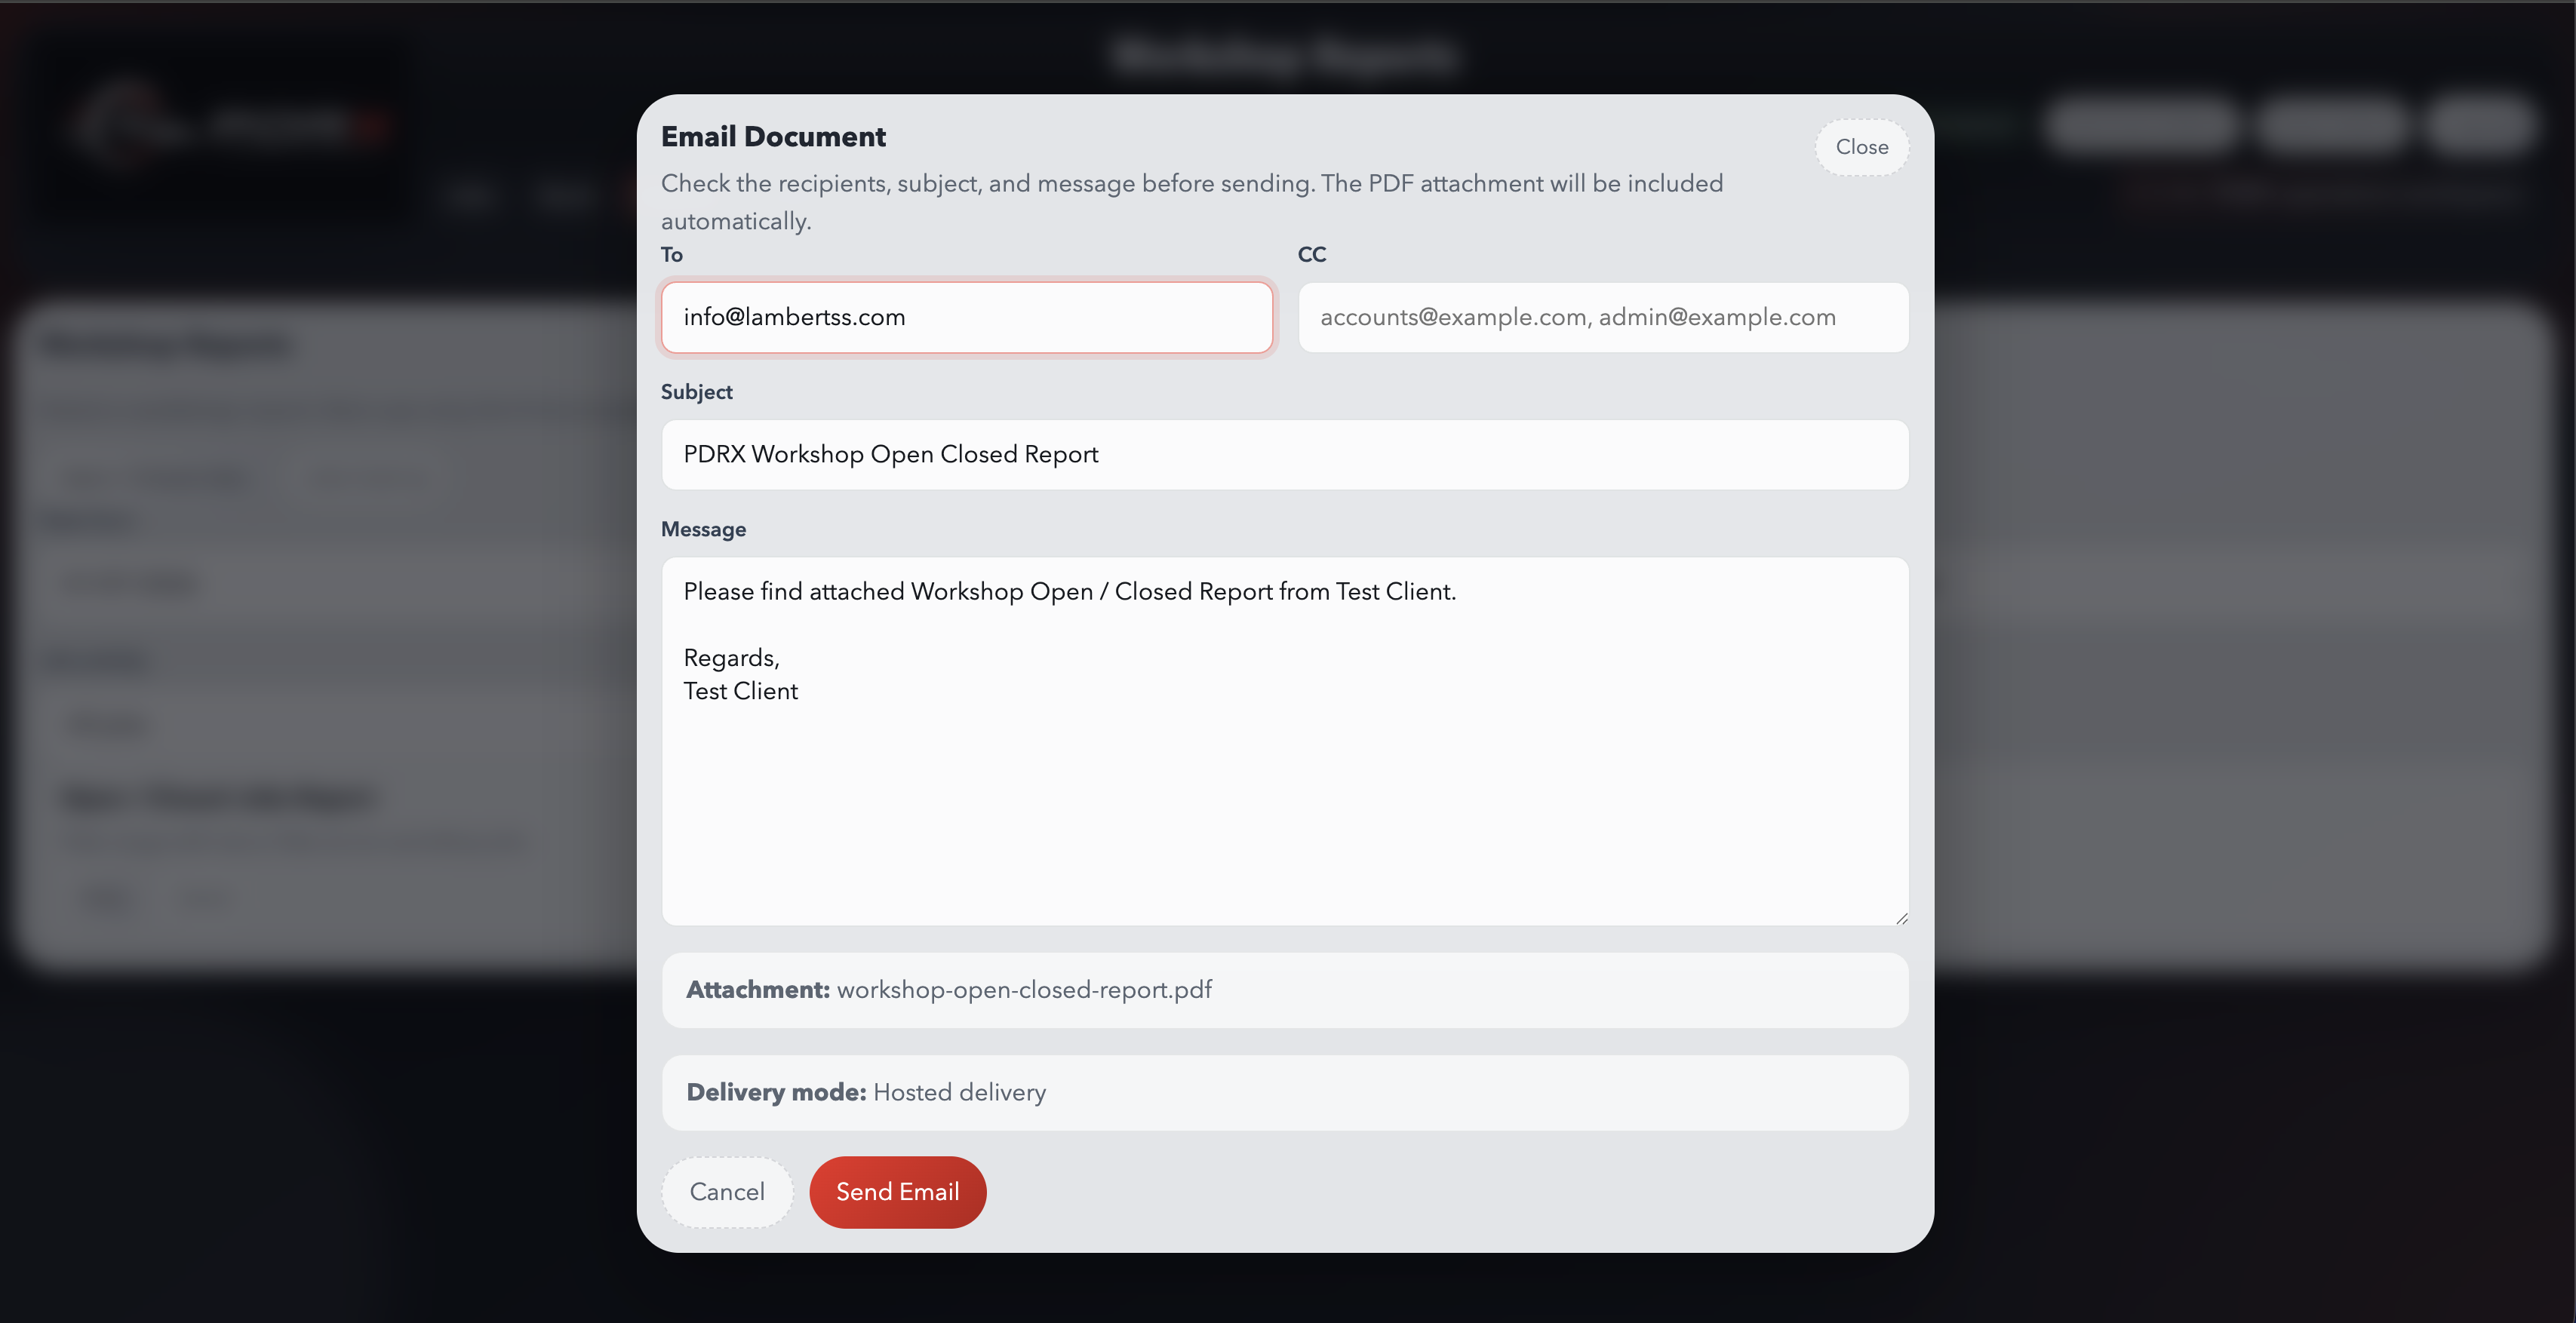
- Email opens a composer window first so the user can confirm `To`, `CC`, subject, and message.
- The PDF attachment is included automatically for document-based emails.
- Replies can go back to the client company email even when the sender is a central PDRX mailbox.
- Orders and jobcards can use the client logo, while general reports can stay clean and logo-free.
Recommended default
Use a central sender such as documents@pdrx.com.na and let replies route back to the
tenant company email unless the client has approved custom SMTP details.
Print a document
- Click the `Print` button on the order, report, or document you need.
- Wait for the PDF or browser print view to open.
- Choose your printer or save to PDF.
Send a document by email
- Click `Email` on the document.
- Confirm `To`, `CC`, subject, and message in the composer window.
- Send the message and verify the success confirmation.
Integration
TMS Bridge
What the bridge does
The Windows TMS Bridge runs on the client PC, reads open jobs from the local TMS source, and pushes them into the online PDRX tenant.
Credentials
The bridge should use the generated sync username and password supplied for that client setup, not a normal portal login.
Auto sync
The bridge can run on a timed interval so open jobs continue refreshing without needing a manual button press each time.
Expected mapping
The client query should expose the agreed job columns, including the ceiling-related value where the client setup supports it.
Test the connection
- Open the bridge on the client PC.
- Enter the generated sync username and password.
- Use the test buttons for PDRX and the local TMS before syncing.
Enable auto sync
- Save the bridge settings first.
- Enable timed sync and choose the interval.
- Leave the bridge running so the schedule continues to work.
Support
Troubleshooting
Email button opens nothing or falls back
Confirm the hosted mail composer is available and the tenant email settings are saved. If fallback appears, refresh the page and test again.
Email sends but no PDF arrives
Check the hosted PDF generation path, sender configuration, and mail helper/service configuration. Confirm the message is being sent through the intended delivery mode.
TMS connection test succeeds but sync fails
Review the log for mapping issues, API permission issues, or server-side validation failures. A valid token test does not always mean the push payload is accepted.
Ceiling value not showing
Check whether the local TMS query is returning the agreed source field and whether the tenant’s job mapping still matches the current view headers.